本人最近在做一个saas模式的产品开发,公众号只有一个,但服务的客户有多种,在各客户下又有各自的用户。现在有这么一个需求,当用户扫描客户提供的公众号二维码时,会出现对应的客户欢迎语,并且显示客户的LOGO界面。前提是每个客户的LOGO是不同的。是不是有点绕?讲明白点,就如你一个公众号,要被多个商家使用,每个商家都有自己的用户群,那用户在扫码关注公众号,进入公众号需要显示每个商家自己的独特LOGO。
正常的关注公众号二维码图片是可以去公众号开发者后台下载。但这是统一的二维码,无法区分商家。这个时候,我们就需要自己去生成公众号的关注二维码。这个二维码跟网上自动生成的功能不一样。毕竟你扫码后,还得跟第三方的腾讯连接。
一、JAVA编辑生成二维码接口
参数微信公众平台接口https://mp.weixin.qq.com/wiki?t=resource/res_main&id=mp1443433542
我们生成一个永久带字符串的二维码,我们只需要传一个商家的ID,就能识别用户关注时,是扫了哪一个二维码,从而显示对应的商家LOGO
Controller层
@ApiOperation(value = "创建公众号二维码")
@ResponseBody
public Result createQRCode(
 @ApiParam(name = "type", value = "类型(1:临时二维码;2:永久参数为数字的二维码;3:永久参数为字符串的二维码)") @RequestParam() Integer type,
 @ApiParam(name = "validTime", value = "临时二维码的有效时间(秒,最高2592000秒(30天))") @RequestParam(required = false) Integer validTime,
 @ApiParam(name = "IntParameter", value = "数字参数") @RequestParam(required = false) Integer IntParameter,
 @ApiParam(name = "strParameter", value = "字符串参数") @RequestParam(required = false) String strParameter,
 HttpServletRequest request
){
 return wechatPushService.createQRCode(type,validTime,IntParameter,strParameter, this.getUserId(request));
}
业务逻辑层
//获取公众号二维码
private final static String GET_PERPETUAL_QRCODE_URL = "https://api.weixin.qq.com/cgi-bin/qrcode/create?access_token=ACCESS_TOKEN";
//获取TICKET对应的二维码图
private final static String GET_TICKET_QRCODE_URL = "https://mp.weixin.qq.com/cgi-bin/showqrcode?ticket=";
public Result createQRCode(Integer type, Integer validTime, Integer IntParameter, String strParameter,String userId) {
 String accessToken = weChatPushService.getGzhAccessTokenDefaultCfg();//获取公众号Token
 String requestUrl = GET_PERPETUAL_QRCODE_URL.replace("ACCESS_TOKEN", accessToken);//替换URL的参数
 JSONObject json = new JSONObject();
 JSONObject actionInfoJson = new JSONObject();
 JSONObject sceneJson = new JSONObject();
 String fileName = "/sys/QRCode/"+strParameter+".jpg";//图片的下载路径
 if(type == 3){//生成永久带字符串参数的二维码
 json.put("action_name","QR_LIMIT_STR_SCENE");//固定值
 sceneJson.put("scene_str",strParameter);//strParameter是商家ID的参数,也是要跟二维码一同生成的参数
 actionInfoJson.put("scene",sceneJson);
 json.put("action_info",actionInfoJson);
//{"action_name": "QR_LIMIT_STR_SCENE", "action_info": {"scene": {"scene_str": "test"}}} 调用公众号接口的参数格式,json值
 Map<String, Object> map = RequestUtils.json(requestUrl, json);//POST方法调用第三方公众号接口
 String ticket = map.containsKey("ticket")?map.get("ticket").toString():"";//从返回参数中获取二维码ticket值
 if(org.apache.commons.lang.StringUtils.isNotEmpty(ticket)){//使用ticket的值再去调用另外一个接口,下载二维码图片
 File file1 = new File(filePath+"sys/QRCode/");//自己要把图片下载的路径
 if(!file1.exists()){//判断文件路径是否存在,不存在就创建
 file1.mkdirs();
 }
 downloadPicture(GET_TICKET_QRCODE_URL+ URLEncoder.encode(ticket),filePath+fileName);//下载图片
 }
 }
 return ResultUtil.success(fileName);
}
/**
 * 获取默认公众号访问令牌
 */
public String getGzhAccessTokenDefaultCfg() {
 if (StringUtils.isEmpty(defaultGzhAppId) || StringUtils.isEmpty(defaultGzhSecret)) {
 initialize();//读取配置文件里公众号的值(appId和appSecret),这两个值在公众号里有,公众号的接口大多需要这两个参数去获取Token
 }
 return getGzhAccessToken(defaultGzhAppId,defaultGzhSecret);
}
// 获取企业号access_token
private final static String company_access_token_url = "https://api.weixin.qq.com/cgi-bin/token?grant_type=client_credential&appid=CORPID&secret=CORPSECRET";
// 获取开放平台的access_token、openid等认证信息
private final static String GET_TOKEN_URL = "https://api.weixin.qq.com/sns/oauth2/access_token?appid=APPID&secret=SECRET&code=CODE&grant_type=authorization_code";
/**
 * 获取微信公众号访问令牌
 * @param appId appId
 * @param appSecret appSecret
 */
public String getGzhAccessToken(String appId, String appSecret) {
 String accessToken = "";
 try {
 accessToken = redisService.getDataService("WX_AccessToken").getData().toString();//从Redis缓存中获取Token,
 } catch (Exception e) {
 log.error("从缓存微信公众号token失败");
 }
 if (StringUtils.isEmpty(accessToken)) {//如果缓存没有Token,或过期了,将重新去获取一次
 String requestUrl = company_access_token_url.replace("CORPID", appId).replace("CORPSECRET", appSecret);//替换参数
 Map<String, Object> map = RequestUtils.json(requestUrl, null);//POST接口调用第三方接口
 // 如果请求成功
 if (null != map) {
 System.out.print("###############################" + map.toString());
 try {
 accessToken = (String) map.get("access_token");
 redisService.strAdd("WX_AccessToken", accessToken, 700);// (存到缓存中,避免经常去拿token,将近两小时)
 } catch (Exception e) {
 log.error("获取微信公众号token失败,或token保存至缓存失败 ####accessToken" + accessToken);
 }
 }
 }
 return accessToken;
}
POST和GET请求工具类,在获取图片时,需要使用GET
import org.springframework.http.MediaType;
import java.io.*;
import java.net.HttpURLConnection;
import java.net.URL;
import java.net.URLConnection;
import java.util.Map;
/**
 * 工具类
 */
public class RequestUtils {
 @SuppressWarnings("unchecked")
 public static Map<String, Object> json(String url, Map<String, Object> params){
 String content = null;
 if(params != null){
 content = JsonUtils.convert(params);
 }
 String result = post(url, content, MediaType.APPLICATION_JSON, MediaType.APPLICATION_JSON);
 if(result != null){
 return JsonUtils.convert(result, Map.class);
 }
 return null;
 }
 public static void main(String[] args) {
 String post = post("http://www.baidu.com", "", MediaType.APPLICATION_JSON);
 System.out.println(post);
 }
 public static String post(String strURL, String content) {
 return post(strURL, content, null);
 }
 public static String post(String strURL, String content, MediaType mediaType) {
 return post(strURL, content, mediaType, mediaType);
 }
 public static String post(String strURL, String content, MediaType sendMediaType, MediaType receiveMediaType) {
 try {
 URL url = new URL(strURL);// 创建连接
 HttpURLConnection connection = (HttpURLConnection) url.openConnection();
 connection.setDoOutput(content != null);
 connection.setDoInput(true);
 connection.setUseCaches(false);
 connection.setInstanceFollowRedirects(true);
 connection.setRequestMethod("POST"); // 设置请求方式
 if(sendMediaType != null) {
 connection.setRequestProperty("Accept", receiveMediaType.toString()); // 设置接收数据的格式
 }
 if(sendMediaType != null) {
 connection.setRequestProperty("Content-Type", sendMediaType.toString()); // 设置发送数据的格式
 }
 connection.connect();
 if(content != null) {
 OutputStreamWriter out = new OutputStreamWriter(connection.getOutputStream(), "UTF-8"); // utf-8编码
 out.write(content);
 out.flush();
 out.close();
 }
 int code = connection.getResponseCode();
 System.out.println(code);
 InputStream is = connection.getInputStream();
 if (is == null) {
 is = connection.getErrorStream();
 }
 // 读取响应
 int length = (int) connection.getContentLength();// 获取长度
 if (length != -1) {
 byte[] data = new byte[length];
 byte[] temp = new byte[1024];
 int readLen = 0;
 int destPos = 0;
 while ((readLen = is.read(temp)) > 0) {
 System.arraycopy(temp, 0, data, destPos, readLen);
 destPos += readLen;
 }
 String result = new String(data, "UTF-8"); // utf-8编码
 return result;
 }
 } catch (IOException e) {
 e.printStackTrace();
 }
 return null; // 自定义错误信息
 }
 public static String get(String url) {
 BufferedReader in = null;
 try {
 URL realUrl = new URL(url);
 // 打开和URL之间的连接
 URLConnection connection = realUrl.openConnection();
 // 设置通用的请求属性
 connection.setRequestProperty("accept", "*/*");
 connection.setRequestProperty("connection", "Keep-Alive");
 connection.setRequestProperty("user-agent", "Mozilla/4.0 (compatible; MSIE 6.0; Windows NT 5.1;SV1)");
 connection.setConnectTimeout(5000);
 connection.setReadTimeout(5000);
 // 建立实际的连接
 connection.connect();
 // 定义 BufferedReader输入流来读取URL的响应
 in = new BufferedReader(new InputStreamReader(connection.getInputStream()));
 StringBuffer sb = new StringBuffer();
 String line;
 while ((line = in.readLine()) != null) {
 sb.append(line);
 }
 return sb.toString();
 } catch (Exception e) {
 e.printStackTrace();
 }finally {
 try {
 if (in != null) {
 in.close();
 }
 } catch (Exception e2) {
 e2.printStackTrace();
 }
 }
 return null;
 }
}
接口写完后,你可以单元测试调用一下,生成的二维码就可以扫一下,是不是会跳到你对应的公众号界面。自定义二维码已经生成了,但现在跟普通的二维码没区别,因为没有触发事件。接下来,编写一个能让公众号调用你的方法的接口。让公众号告诉你,有人关注或取消关注。
二、事件触发接口
controller层
//微信推送事件 url
@RequestMapping("/openwx/getticket")
public void getTicketMessage(HttpServletRequest request, HttpServletResponse response)
 throws Exception {
 wechatPushService.getTicketMessage(request,response);
}
事件触发逻辑层,看下面代码时,先看官方的文档,这样更能理解返回参数:https://mp.weixin.qq.com/wiki?t=resource/res_main&id=mp1421140543
 public String getTicketMessage(HttpServletRequest request, HttpServletResponse response) throws Exception {
 System.out.println("1.收到微信服务器消息");
 Map<String, String> wxdata=parseXml(request);
 if(null != wxdata){
 String key = wxdata.get("FromUserName")+ "__"
 + wxdata.get("ToUserName")+ "__"
 + wxdata.get("MsgId") + "__"
 + wxdata.get("CreateTime");
 Result keyRedisResult = redisService.getDataService(key);
 System.out.println(keyRedisResult.getStatus());
 if(keyRedisResult.getStatus() == 200){//防止公众重复推送消息,所以第一次把消息送缓存中,如果存在了就不处理
 return null;
 }
 redisService.strAdd(key,"1",3600);//不存在的话,放缓存里,记得加一个失效时间,避免一直存在,占用资源
 String Event = wxdata.get("Event");
 System.out.println("Event"+Event);
 if(Event.equals("subscribe") || Event.equals("SCAN")){//扫码带参数的二维码进入的
 String EventKey = wxdata.get("EventKey");//获取参数
 String FromUserName = wxdata.get("FromUserName");//OpenID
 if(EventKey.indexOf("_") != -1){//初次关注
 EventKey = EventKey.substring(EventKey.indexOf("_")+1);
 }
 System.out.println("EventKey:"+EventKey);
 Map map = (Map)result.getData();
 TextMessage textMessage=new TextMessage();
 textMessage.setToUserName(wxdata.get("FromUserName")); //这里的ToUserName 是刚才接收xml中的FromUserName
 textMessage.setFromUserName(wxdata.get("ToUserName")); //这里的FromUserName 是刚才接收xml中的ToUserName 这里一定要注意,否则会出错
 textMessage.setCreateTime(new Date().getTime());
 textMessage.setMsgType("text");
 textMessage.setContent("欢迎您关注"+map.get("departmentTopName")+"电子送达");
 MessageUtil messageUtil = MessageUtil.getInstance();
 String xml=messageUtil.textMessageToXml(textMessage);
 System.out.println("xml:"+xml);
 response.setCharacterEncoding("UTF-8");
 PrintWriter out = response.getWriter();
 out.print(xml);//用户关注时,发一个欢迎语给用户
 out.close();
 }
 }
 return null;
 }
三、触发接口写完后,需要去公众号后台去设置你的接口服务器,让公众号知道你的接口地址。
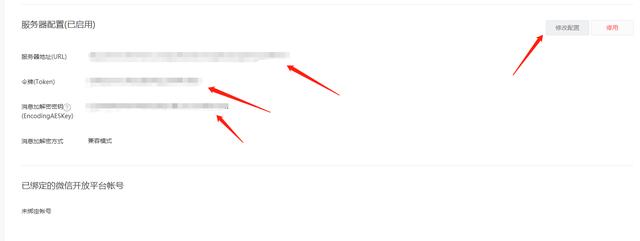
修改配置,服务器地址为你部署的地址,必须对方能连上,而且需要80端口(如果80端口被占用,可以使用Nginx做转发),在配置的时候,公众号会尝试调用,调用不到你的接口,会直接提醒你。
配置完后,点击启动。这个时候你再去关注你刚才生成的参数二维码,就会有反映了。记得在事件触发接口中,增加你的业务。用户关注或取消关注时,你要做什么。
另外,在启动配置后,你会发现,你的公众号自定义菜单不见了,这个时候不要慌。接下往下看。

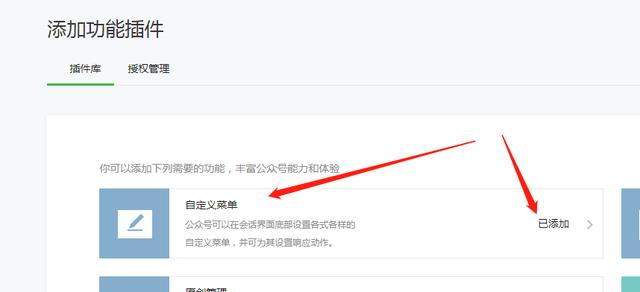
启动菜单

这个时候公众号上的小菜单就有了。但公众号后台自定义菜单还是看不到?那怎么修改菜单呢?
很简单,先把前面开启的服务器配置给停止了,然后再改你的菜单,修改完菜单后,你再开始服务器。到此就完成了生成及事件监听的过程
